WARNING: Please note that this article describes my experience and the results you might get reproducing what I did could be different. Please understand that I am not responsible for the results you might get reproducing what I did. If you choose to follow my notes and something bad happens, don't blame me, you are responsible for what you do. In doubt, my advice is to go and read some news.
NOTE: This review is based majorly on the Sparky Linux image before 1.2. I've added a chapter "How to avoid too much trouble" on the 1.2 update. You can find the links to the updated images at this page: github.com/sparkysbc/sparky_linux_images.
What it is
While "Vana" is a Sanskrit word for music, VANA PLAYER is instead an audio set, made up of several add-on boards. Its core is SPARKY, a quad core CortexA9 Single Board Computers (SBC) with lot of ports (HDMI, USB 3.0, 2 x USB 2.0, Micro-USB for power, microSD slot). Like the Raspberry Pi (RPI), also this SBC is a credit card-sized computer equipped with 40-pins header connector. It supports Linux operating systems, in particular the Max2play distro, which simplifies the installation of Squeezelite/Logitech Media Server and Shairport as players.
All those who are interested in high-quality music streamers will be pleased to know that ALLO.com, a Canadian company specialized in manufacturing VOIP hardware in Bangalore (India), has developed a lot of stuff around its SBC. Not only two 50W Class D amplifiers, the VOLT and the VOLT+, and two DAC shields, the PIANO and the PIANO 2.1, but also a re-clocker, the KALI, designed to be placed between the SPARKY SBC and the PIANO DAC. The DAC comes in two versions, one with a PCM 5122 chip and a TPA6133A2 headphone amplifier (PIANO HIFI DAC), the other with 2 x PCM5142 chip (with integrated DSP) and 2 x RCA outputs for one or two sub-woofer units (PIANO 2.1 HIFI DAC).
While in most DACs the re-clocking function is integrated into the chip, KALI is a FPGA board (Field-Programmable Gate Array) designed to buffer and play the incoming data with the same timing with which they are taken from the source (say SPARKY SBC or RPI). Two NDK quartz crystals are used to re-clock the signal (outside the FPGA) and feed a low jitter I2S input to the DAC, provided that that works in Slave mode. Another component you may want to add to this (almost) complete audio set is the Capacitance Multiplier shield, a standalone power filter specially designed to reduce the output ripple of the power supply while maintaining its voltage.
How to assemble it
KALI re-clocker has a 40-pins header on both sides of the board, so you can connect it both with the SPARKY SBC (bottom side) and the PIANO or PIANO 2.1 DAC (upper side). Standard 12mm plastic spacers will separate the three PCBs, while KALI will feed the SBC and the DAC boards at same time (it require +5V DC power source to operate).
Afterwards, you have to fix the VOLT amplifier to the top side of the DAC (through a 16-GPIOs connector) and the DAC will deliver the audio signal to the amp (through another 8-pins header). If you choose to do without the VOLT amp, you can take that signal from the 2 x RCA outputs of the DAC and convey it to a different amplifier.
Please, note that due to the lack of input connectors, VOLT cannot receive the signal from a remote device.
VOLT lacks also a volume knob, but you can use a 6-pins connector to adjust the volume from a remote potentiometer. Alternatively, ALLO offers a standalone 2 x 50W digital amplifier (VOLT +) equipped with the same chip of VOLT (Texas Instruments TPA3118D2) but with 2 x RCA input connectors in addiction. Unlike VOLT, VOLT+ has a 10K logarithmic potentiometer for volume control and a built-in CM filter circuit.
Having opted for the VOLT amp, you may enclose the entire audio kit in two transparent acrylic panels and connect your speakers' cables into the left and right screw terminal blocks of the amp.
The microSD (flashed with the Sparky OS) has to be plugged in the microSD-slot, the Ethernet cable connected to its port. KALI re-clocker will feed both the SBC and the DAC with a +5VDC.
Once that is done, you just need to connect a 19V DC power supply to the CM shield, which is connected in turn to the VOLT amp. A common 19V DC PSU for laptops will work well enough for that purpose.
How it works
At this point, you have to scan your local network in order to find the Sparky SBC's IP address. On my Android phone, I use a free network scanning application named "Fing", but in every Linux environment you can install the nmap or arp-scan tool to perform the task. So, run the following commands from a Linux system:
sudo nmap -sP 192.168.1.0/24
sudo arp-scan --interface=eth0 -localnet
In my case, the SBC device is detected as pcm5122. Enter the IP address into a web browser and take a look at the main page of Max2Play web-interface. The image flashed in the microSD I received from ALLO.com is based on Ubuntu 12.04.
The system runs both Squeezelite/LMS and Shairport at the boot-up. To disable the option uncheck the "Autostart" check-boxes and save (fig. 1). The "Start" tab will alert you of any available update. Browse to the "Settings/Reboot" tab and click on "Update Max2Play" button in order to the update your software (my current version is 2.36).

fig. 1
Right after the reboot, you can browse to the "Filesystem Mount" tab and mount a network path (e.g. NFS) or an external storage drive (e.g. USB devices, plugged in the SBC's USB ports). Don't forget to click on "save" button in order to fix the mount-point for the next restarts (fig. 2).

fig. 2
If your devices are not detected in the mount list, you can mount them via command line. Open a shell prompt and connect to the SBC system using a SSH client (PuTTY works well in Windows). The default user-name is (strangely enough) pi , and the password pi . If you want to change the default password, type passwd pi and enter a new password twice.
When I launched the command sudo -i as a means to gain root privileges, the following error occurred:
unable to resolve pcm5122
I've just replaced the host-name Sparky with pcm5122 in the /etc/hosts file to fix the problem. You can edit the file with the command:
nano /etc/hosts
Then, change the host-name, save and exit (Ctrl+O, Enter, Ctrl+X). Now, you will be able to either mount your device in an existing directory (e.g. /media/usb1/ ) or to create a new one (e.g. /mnt/pendrive ) using the mkdir command:
sudo mkdir /mnt/pendrive
Use the chmod command to set the new directory's permissions
sudo chmod 766 -R /mnt/pendrive
Of course, before mounting the volume, you need to run blkid or lsblk in order to find out some information about your block device and filesystems. E.g., if you have a fat32 partition displayed as /dev/sda1 , your command to mount that partition into the /mnt/pendrive mount-point will be:
sudo mount -t vfat /dev/sda1 /mnt/pendrive
Run the ls command to check the outcome:
ls /mnt/pendrive/
Maybe, there will be bad lines in the /etc/fstab file. In order to fix possible error/warning messages, you should edit the file with nano /etc/fstab and comment with a # character each line starting with -e . Then, save and exit (Ctrl+O, Enter, Ctrl+X). Once the new mount-point is added, you can use the LMS web-page in order to visualize and play your favourite tracks.
In order to open that page, you have to go to the "SqueezeBox Server" tab and click on "Open Squeezebox Server Webadministration". A quick way to do the same thing is to copy your SBC's IP at port 9000 from a web browser, e. g. http://192.168.1.65:9000 (fig. 3).

fig. 3
Now, you are in touch with Logitech Media Server (LMS). Click on "Settings" on the bottom right corner of the web-GUI. As the new page pops up, use the button "Browse" near the empty check-box field to add your new folder's path. Finally, click on the "Apply" button on the bottom right corner and come back to the LMS's GUI. Click on "Rescan" to create a new empty check-box (fig. 4).
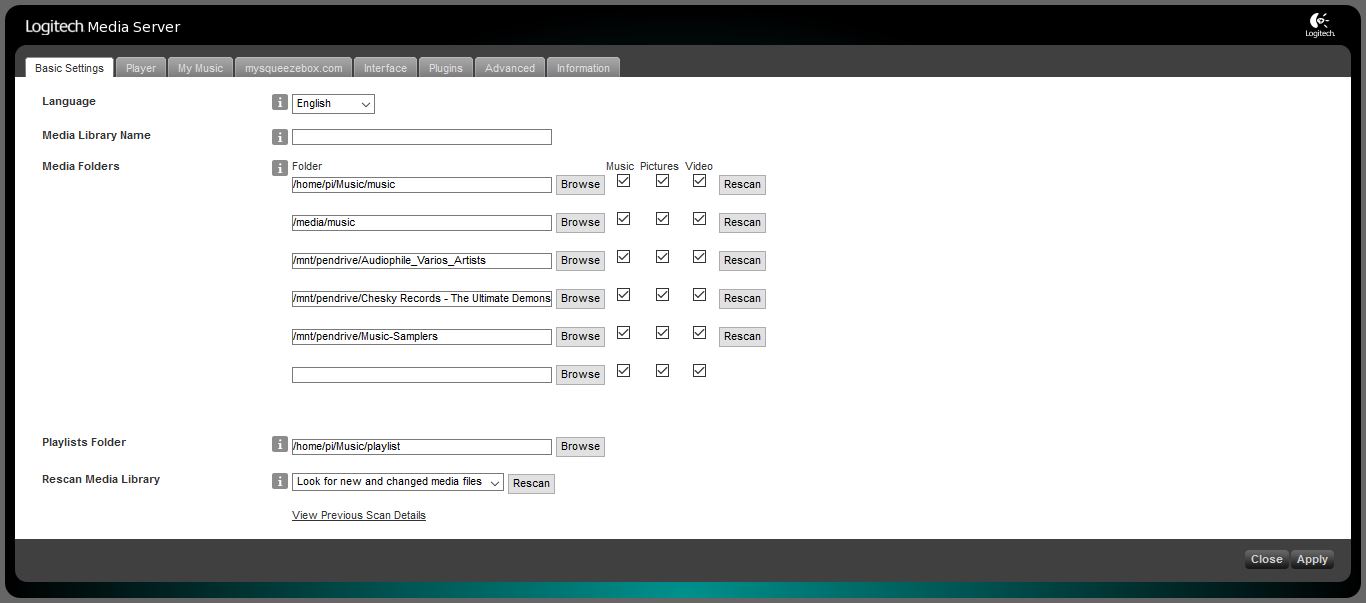
fig. 4
Here, click on "My Music" or "New Music" so as to find the audio files you wish to play or add to your playlist. From the same (really slow) web GUI, you can also choice some settings, such as repeat or shuffle, or adjust the volume from a poor-grained (11 steps) bar.
Knowing the SBC's IP address, the user-name (pi) and the password (pi), you can also use a FTP or SFTP graphical client (such as FileZilla) to transfer your audio files from a remote device to the existing /home/pi/Music/music/ directory. Your files will appear in LMS's GUI under "My Music" folder (another main option under "Home" menu is "Radio2, a long list of internet radio stations streaming live).
The user manual shared from Allo.com tells us that LMS/Squeezelite can be remotely controlled by many Android apps, such as Logitech Squeezebox Controller, Squeeze Controller, or Squeezer.
At least from my experience, LMS works well only with the latter (I don't know about the not-free app Squeeze Ctrl), but even Bubble UPnP allows you to playback your music, provided that the "pcm5122" SBC is successfully detected as local renderer. If so, select "Local Media Server" from the Library and click on the "Music Folder" to choose your files.
Once again from my experience, Squeezebox plays well any 24-bit/192 KHz .flac file. Ot doesn't play .wma nor .wmal files. Maybe you can take a look at LMS > Settings > Player > Advanced > File Types to fix that issue.
Another caveat: even if you activate the graphical Equalizer and save the settings in the Max2Play's "Audioplayer" tab, it won't work unless you click on "Edit Advance Options", select "Plugequal" under the heading "Soundcard", and save (fig. 5). I preferred to disable it.

fig. 5
NOTE:
If you face any difficulty in connecting with LMS, maybe you have an issue with port 9000. Because LMS changes port if other services are using its default port, you better switch it to another number from the LMS web GUI. For example, in my case:
"LMS" > "Settings" > "Advanced" > "Network" > "Web Server Port" #9123 (where 9123 is the new port).
Apply and close..
How it sounds to me
Just one or two things to say before I tell you my listening impressions. First of all, LMS applies software volume control by default; so, although the maximum level would be adequate for a relaxing listening, it is too low for a good test. In order to set the output in bit-perfect, you should go to the "Audio" tab (LMS > Settings > Player > Audio) and apply the following changes: "Crossfade: None"; "Smart Crossfade: Disable Smart Crossfade"; "Output level is fixed at 100%" rather than "Volume controls adjust outputs" (fig. 6).
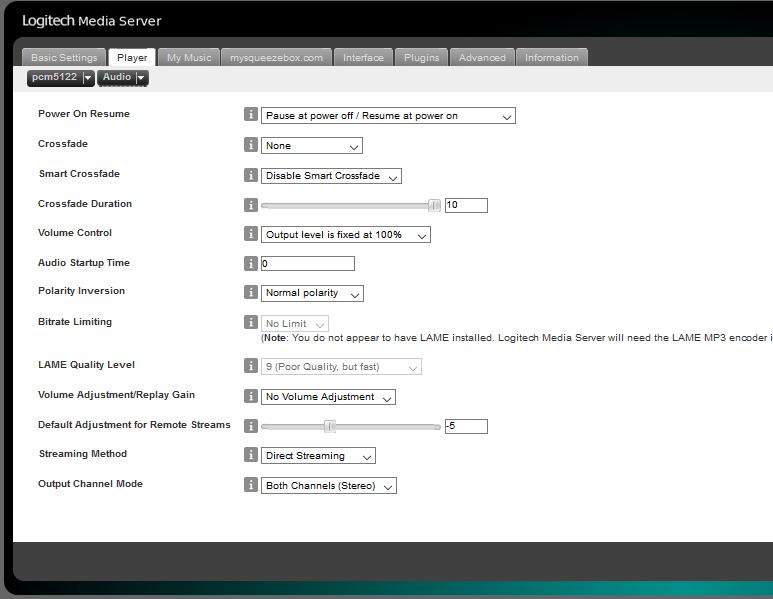
fig. 6
To save the changes click on the "Apply" button. In this way, having connected a separate amplifier with a volume control knob to the PIANO DAC's RCA outputs, I've been able to adjust the level of the outputs without touching the GUI's volume bar, that is, without a software tool. Anyway, for those who love the bit-perfect output, the lack of a volume control knob on the VOLT amp is a bad news, which can be remedied only by using a separate amplifier or connecting a logarithmic pot (or a rotary encoder) to the six male pins on the amp's board.
Even at loudest volume the sound is, by the way, surprisingly low for a test (or a party). Luckily enough, you can directly control the volume from your sound-card: just modify the default setting by adding the line -o hw:0 -V Digital in to the "Command line options" of Squeezelite's "Edit Advanced Options", under the "Audioplayer" tab (as per Max2Play's instructions). The option will say to Squeezelite to connect the volume control to hardware instead of software (fig. 7).
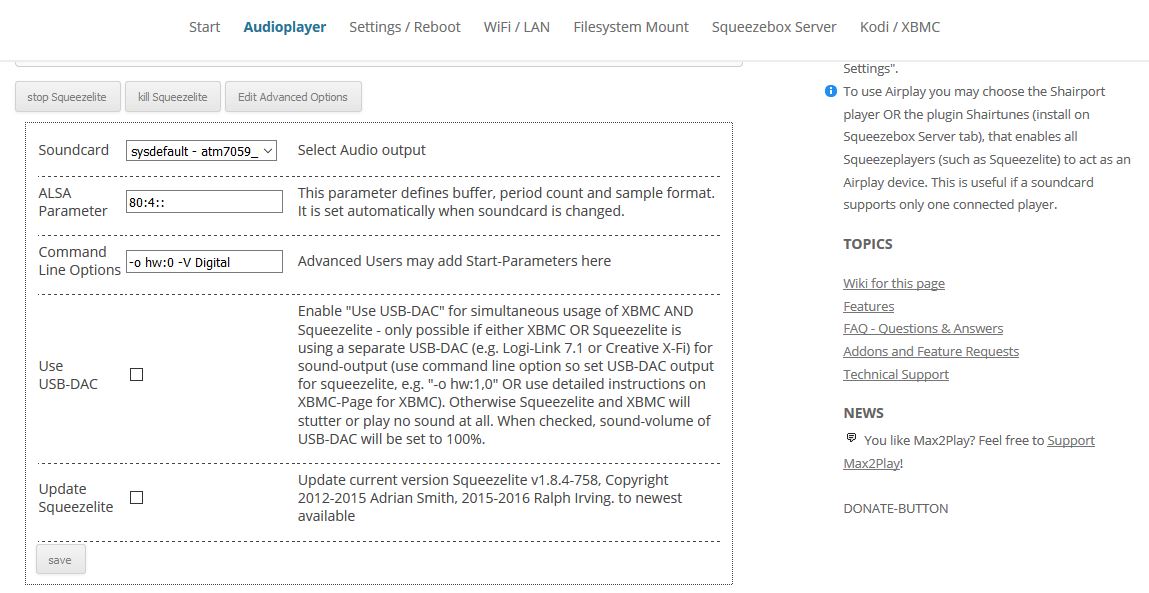
fig. 7
Secondly, but not of secondary importance, even if the PIANO 2.1 DAC can work both in 2.0 (all frequencies pass to the LR outputs) and 2.2 scenarios, it is pre-programmed to be a 2.1, so you shouldn't use it without an active sub-woofer. Usually I don't put a sub-woofer beside my tower speakers. However, having nothing against subs, and above all against good bass, occasionally I use a bass-reflex sub in combination with two bookshelf loudspeakers.
Of course, in order to test the VANA Player (along with the PIANO 2.1 DAC) with my passive sub, I had to connect a separate digital amplifier (with control volume) to the DAC's Sub-LR outputs as a means to drive it in bit-perfect.
Because most crossover filters cut the frequencies at 80 Hz, I suppose that that is the default level for the PIANO 2.1 too. Anyway, due to the PCM5142 chip and its DSP integrated, you should be able to adjust the filter cut-point as you wish. Compared with the Sure TPA3116 amp, which I used to test the DAC's LR outputs, the less powerful TPA3118 on VOLT board sounds a bit flatter and thinner. In return, it seems very clear and bright while having amplitude of sound. If you have two monitor speakers and a sub that boosts the bass, a cool amp could be the right choice, especially for long listening periods.
In combination with two 2-way Scythe Kro Craft (8 ohms 58Hz - 20kHz), VANA Player sounded airy and detailed in the high frequency, punchy and warm in the low one. In the Vivaldi's "Winter" (Connecticut Early Music Festival Ensemble) the transient response was fast, the image solid and accurate, the strings appeared expressive and sweet. In Paul Stephenson's "If You Want My Love" and in Tish Hinojosa's "Fence Post" the treble was smooth and refined, while the midrange was rather articulated.
All in all, the sound is quite balanced and natural, especially in the reproduction of female voices, and you have the impression that everything is always in control. Taking a closer look at the VOLT, every component seems to be good quality (at least at first sight), but I don't exclude that some change would be beneficial.
As it is, both the Capacitance Multiplier and the re-clocker do their job in filtering the ripple and reducing the jitter. I have increased the supply voltage from 19V to 21V DC in order to give a bit of fullness and roundness to the deep range. I'm very curious to compare the PIANO 2.1 (PCM5142) to the PIANO 2.0 (PCM5122) and I'll tell you my impressions when I'll try the latter too.
How to fine-tune it
I have tried VANA Player also in combination with two old floor-standing speakers (B&W V204, 4 ohms, 34Hz-22kHz - 90dB). Besides a different placement of the sub-woofer unit, a fine-tuning of the crossover settings was required for the new chain. Here, the standard configuration that you will find in the /etc/asound.conf file:
ctl.!default {
    type hw
    card 0
}

pcm.equal {
    type plug;
    slave.pcm plugequal;
}

ctl.equal {
    type equal;
}

pcm.plugequal {
    type equal;
    slave {
        pcm "plughw:0,0";
    }
    hint {
        show on;
        description "Equalizer for plughw:0,0"
    }
}
You can rename this file using the mv command:
mv /etc/asound.conf /etc/asound.conf_old
Then, you can create a new asound.conf to paste in it a more suitable configuration. About that, I followed two useful tutorials focused on digital filters for sub-woofer channel:
- http://alsa.opensrc.org/Low-pass_filter_for_subwoofer_channel_(HOWTO)
- http://www.diyaudio.com/forums/twisted-pear/277564-ladspa-filters-digital-crossovers-bbb.html
In a nutshell, the asound.conf file has two sections: the first section (pcm.upmix_20to51) says that the two stereo channels will be mixed together into a third (sub-woofer) channel, by taking 0.5 of the left and 0.5 of the right channel. The second one (pcm.lowpass_21to21) says that two LADSPA plugins (id 1098 and id 1672) will be used to apply the low-pass filter to the sub-woofer channel after that all channels are copied from the input to the output. Two control values are used to set the cutoff frequency (in Hz) and the resonance (0.0 to 4.0).
Obviously, for these changes to take effect you should not only stop and restart the squeezelite process, but also install some packages. In particular, you need to install the BLOP plugin set and the Computer Music Toolkit (CMT).
Now, it may be that, when you try to install anything via command line, you receive a notification like this:
You might want to run 'apt-get -f install' to correct these:
The following packages have unmet dependencies:
libmad0-dev : Depends: libmad0 (= 0.15.1b-7ubuntu1) but 0.15.1b-7 is to be installed
E: Unmet dependencies. Try 'apt-get -f install' with no packages (or specify a solution).
To correct the issue run:
apt-get -f install
Type Y and enter. You will read the following message:
The following extra packages will be installed:
libmad0
The following packages will be upgraded:
libmad0
You can now update and install the required packages:
apt-get update
apt-get -y install ladspa-sdk cmt
Of course, you can download the ladspa package (rt-plugins-0.0.3.tar.gz) from here: http://faculty.tru.ca/rtaylor/rt-plugins/index.html. In that case, you have to create a new directory for filters:
mkdir /opt/filter
chown pi:pi /opt/filter
Move the downloaded file in the new folder (via Filezilla, if you wish), then, decompress it and go to the rt-plugins-0.0.3 directory. There, install the plugins.
tar -xvf rt-plugins-0.0.3.tar.gz
cd /rt-plugins-0.0.3
make
make install
Move all the files from the /usr/local/lib/ladspa/ to the /usr/lib/ladspa/ directory.
mv /usr/local/lib/ladspa/* /usr/lib/ladspa/
ls /usr/lib/ladspa/
Now, it's time to create a new asound.conf file for your configuration. First of all, you should run aplay -L to print the list of your devices. This is the outcome:
null
Discard all samples (playback) or generate zero samples (capture)
pulse
PulseAudio Sound Server
sysdefault:CARD=atm7059link
atm7059_link,
Default Audio Device
Now, you know our sound card is atm7059_link.
Following a tutorial on how to control the volume from the software side (http://alsa.opensrc.org/How_to_use_softvol_to_control_the_master_volume), I've added to my asound.conf a "Pre-amp" option, so as not to be bounded by LMS's control when I use VOLT amp without a pot.
#CARD=atm7059link
pcm.softvol {
    type	softvol
    slave {
        pcm	"CARD=atm7059link"
    }
    control {
        name	"Softmaster"
        card	0
    }
}

pcm.!default {
    type	plug
    slave.pcm	"softvol"
}

pcm.softvol {
    type	softvol
    slave {
        pcm	"CARD=atm7059link"
    }
    control {
        name "Pre-Amp"
        card 1
    }
    min_dB -30.0
    max_dB 30.0
    resolution 6
}

pcm.upmix_20to51 {
    type	plug
    slave.pcm lowpass_21to21
    slave.channels 3
    ttable {
        0.0	1	# left channel
        1.1	1	# right channel
        0.2	0.5	# mix left and right ...
        1.2	0.5	# ... channel for subwoofer
    }
}

pcm.lowpass_21to21 {
    type	ladspa
    slave.pcm	upmix_21to51
    path "/usr/lib/ladspa"
    channels 3
    plugins {
        0 {
            id 1098 # Identity (Audio) (1098/identity_audio)
            policy duplicate
            input.bindings.0 "Input";
            output.bindings.0 "Output";
        }
        1 {
            id 1672 # 4 Pole Low-Pass Filter with Resonance (FCRCIA) (1672/lp4pole_fcrcia_oa)
            policy none
            input.bindings.2 "Input";
            output.bindings.2 "Output";
            input {
                controls [ 180 2 ]
            }
        }
    }
}
Here, we have a virtual pcm device called softvol which is controlled by a volume control called "Softmaster". "Softmaster" pass the sound with the changed volume to its slave (in our case: CARD=atm7059link). More on the Alsa Pre-amp option here:
- https://docs.slackware.com/howtos:hardware:sound_problems_on_slackware
- http://alien.slackbook.org/blog/adding-an-alsa-software-pre-amp-to-fix-low-sound-levels
As it regards, instead, the low-pass, I tried many control values between 100 and 300, but, after having listened to many revealing tracks for lower and upper bass (e.g. "Dr. Lupo - Audiomatic Remix" by Ace Ventura, "Ain't No Sunshine" by Jacqui Naylor, "Marche au supplice" by Berlioz, "Toccata and Fugue" by Bach), I concluded that a value between 150 and 200Hz was good enough for my set-up.
Once chosen the value that suits your set-up, paste the preferred configuration in the asound.conf file. Save it, exit (Ctrl O, Enter, Ctrl X) and make a reboot. Note that, even if the "stop" and "start" Squeezelite buttons don't work well (at least in my case), you may kill the service also from the "kill Squezeelite" option, as well as to make a reboot by clicking on the "Reboot" button on the "Settings/Reboot" tab. At worst, turn off the 19V amp power, turn off the 5V SBC power, and turn them on again in reverse order.
Note also that, after the reboot, you will be no longer able to activate the graphic equalizer in the "Audioplayer" tab (fig. 8). As expected, due to the new configuration, the "Plugequal" option will disappear from your "Soundcard" list ("Audioplayer" > "Edit Advanced Option").

fig. 8
On the other hand, having updated Max2Play ("Settings / Reboot" > "Update Max2Play"), you will notice how the control values for "Lowpass filter" and "Crossfeed level" (in the "Audioplayer" tab) change accordingly (fig. 9).

fig. 9
You can modify the control values directly from the graphical bar, but the system will crash as soon as you click on the "Save" button - so that you will have to manually reboot it. However, upon reboot, the new values will be written in the asound.conf file.
Don't forget to select and save sysdefault - atm7059_link, - Default Audio Device, CARD=atm7059link as audio output in the "Soundcard" checkbox ("AudioPlayer" > "Edit Advanced Options").
How to avoid too much trouble
An easy way to avoid all these changes is to make use of the latest image (version 1.2) of Max2Play for Allo Vana Player, downloadable links available from here: https://github.com/sparkysbc/sparky_linux_images. Flash the unzipped sparky_sd_ubuntu_141016.img in your microSD and browse to the Max2Play's main page via a web-browser (entering its IP address directly into the URL bar).
In the "ALLO" tab, select and save your DAC version (in my case "Allo Piano HiFi DAC 2.1") where you read: "Your installed Allo Card". Then, start the squeezebox installation in the "Squeezebox Server" tab (fig. 10). If a message warns you that LMS is missing, you need to install it via a terminal session (e.g. SSH). This time, more logically, the user is vana and the default password is vana.
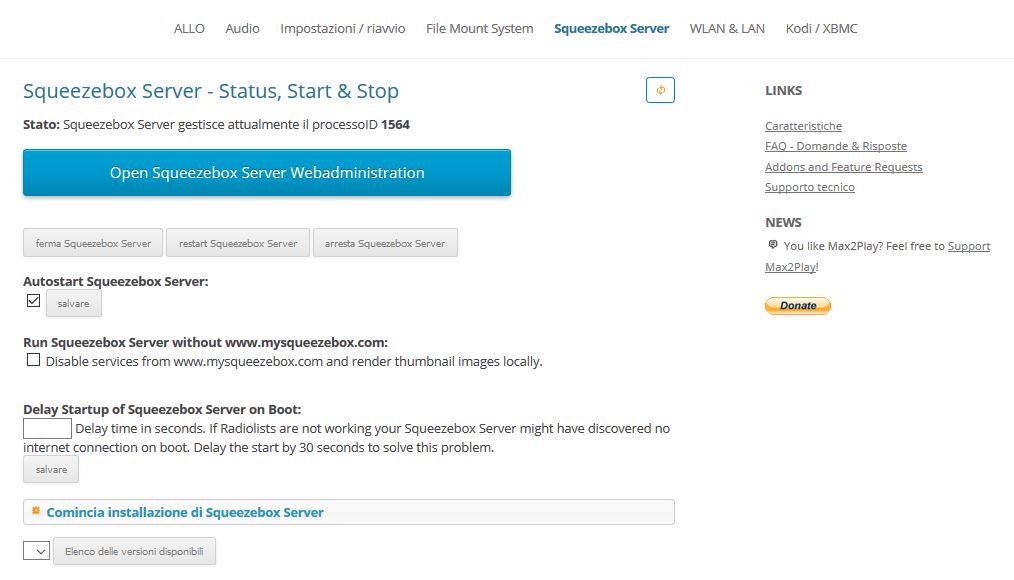
fig. 10
After having launched the apt-get update command, there are few commands to be executed in order to install LMS 7.9.0.
mkdir -p /sources
cd /sources
url="http://www.mysqueezebox.com/update/?version=7.9.0&revision=1&geturl=1&os=deb"
latest_lms=$(wget -q -O - "$url")
wget $latest_lms
lms_deb=${latest_lms##*/}
dpkg -i $lms_deb
Check whether the server is running:
service logitechmediaserver status
Next, backing to the "Squeezebox Server" tab and clicking on "Open Squeezebox Server Webadministration" (or browsing https://IP_address:9000), you will be invited to login with email and password (or to create a new account) to access MySqueezebox.com (you can also skip registration clicking the bottom-right Skip button (fig. 11).

fig. 11
If the "Filesystem Mount" tab says your music folder's mount-point is /media/usb/, choose that path in the displayed settings. You can also write your path later, from the LMS's GUI, where the player is named "max2play" ("Settings" > "Basic Settings" > "Media Folders").
As regards the volume control and the Lowpass filter, the settings bars displayed in the "Audioplayer" tab allow you to choose the volume and the cut-off frequency of the subwoofer and the master volume, while the "Analogue Playback Boost" and the "Analogue Boost" bars can only be either 0 or 100 (fig. 12). This is the main difference main difference from the previous Max2Play's release for ALLO.

fig. 12
With the exception of the "Analogue Playback Boost", which I set at 100, the default values you see below are (more or less) well-suited for my set-up. I have 69 for master volume and 78 for sub volume. Higher levels for master volume tend to cause clipping, distortions and every sort of buzzing sound and "essing" voices.
- Settings for Master Volume (100 = 0 dB) 65
- Settings for Subwoofer Volume (100 = 0 dB) 81
- Settings for Analogue Playback Boost (Optimum 100%) 0
- Settings for Analogue Boost (Optimum 100%) 100
- Settings for Subwoofer Cut-Off Frequency (Lowpass filter) 60
Maybe, for your choices to take effect, you need to select and save under the SoundCard list the "sysdefault" line, rather than the "default" one (fig. 13). The path is: "Audioplayer" > "Edit Advanced Options" > "SoundCard". The line -V Digital -a 80:4:: is already set.
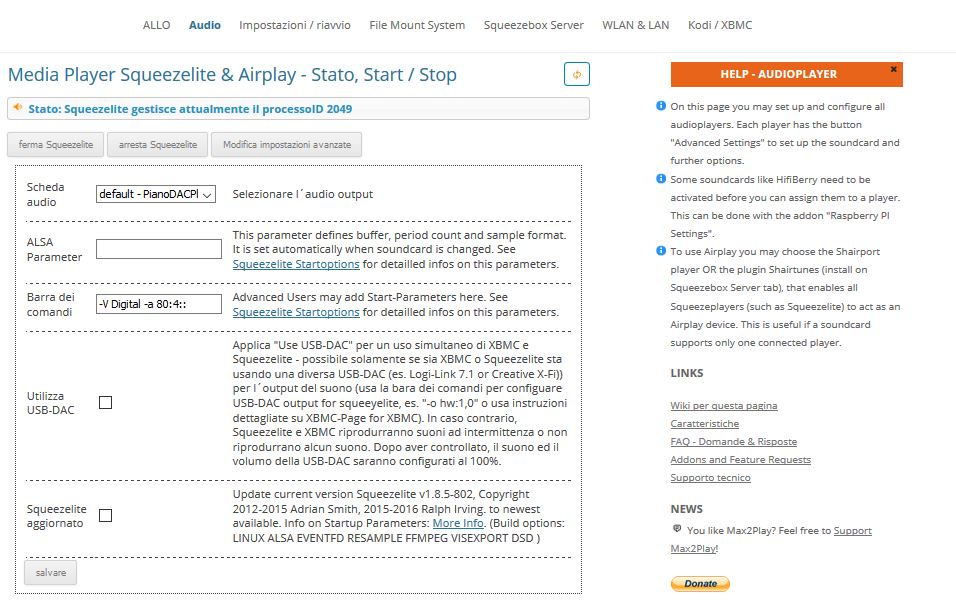
fig. 13
Another thing you can choose to do is to disable the software volume control from LMS's Settings (see fig. 6 above). The path is: "Player" > "Audio" > "Output level is fixed at 100%" > "Apply". Since in the new release you have a master volume control bar, you will have no difficulty to set the right level for your ears, provided you have an attenuator.
"The Best of Chesky Classics & Jazz and Audiophile Test Disk, Vol. 3" could be useful for your purpose of a fine calibration: http://www.chesky.com/album/best-chesky-classics-jazz-audiophile-test-disc-vol-3-jd111
This is the end of my review. I hope you enjoyed reading as I enjoyed testing the devices. well in your meeting with VANA.
I wish you well in your meeting with VANA.
Hardware specifications
Below, some hardware specifications from Allo.com website
SPARKY SBC
- Processor: Actions Semi S500 (4x Cortex-A9 @ up to 1.6GHz); PowerVR SGX544 GPU
- Memory: 1GB or 2GB DDR3 RAM
- Optional 8GB to 64GB eMMC flash
- Optional NAND flash
- MicroSD slot
- Networking: 10/100 Ethernet port (2x GbE via shield option)
- Other I/O:
- USB 3.0 host port
- 2x USB 2.0 OTG ports
- Micro-USB port (for power)
- HDMI port up to 1080p@60fps
- 34-pin LCD connector
- 24-pin 5-megapixel camera interface
- IR interface
- 50-pin telecom connector
- Uext connector for Olimex board7
- Expansion: 2 x 20 pin Raspberry Pi HAT-compatible header with optional shields
- Other features: LEDs; power, reset, volume, home buttons
- Operating temperature: 0 to 40∞C
- Power: 5V DC via micro-USB
- Dimensions: 95 x 58 x 16mm
- Operating system: Android; Linux (Ubuntu 14, Arch ARM, OpenELEC, Fedora)
PIANO HIFI DAC
- 384 kHz/32bit PCM5122
- 138mW TPA6133A2
- 2 x RCA + 3.5mm phone jack
- SNR 112dB
- THD+N @ - 1dBFS -93dB
- Full Scale Output 2.1Vrms
- Dynamic Range 112dB
- Sampling Frequency 8 kHz to 384 kHz
- Ultra-low-noise voltage regulators
- Integrated EEPROM for automatic configuration (with write-protection)
- Headphone Output Power 138mW
- Headphone Half Power THD + N @ 1 kHz (%) (kHz) -> 0.008
- Headphone SNR 93dB
- Headphone PSRR 109dB
PIANO 2.1 HIFI DAC
- 2 x 384 kHz/32bit PCM5142
- 4 x RCA
- SNR 112dB
- THD+N @ - 1dBFS -93dB
- Full Scale Output 2.1Vrms
- Dynamic Range 112dB
- Sampling Frequency 8 kHz to 384 kHz
- Ultra-low-noise voltage regulators
- Integrated EEPROM for automatic configuration (with write-protection)
- KALI RECLOCKER
- FPGA - FIFO board
- I2S input: 44.1 KHz, 48 KHz, 88.2 KHz, 96 KHz, 176.4 KHz, 192 KHz - 16bit, 24bit or 32bit
- I2S output: 44.1 KHz, 48 KHz, 88.2 KHz, 96 KHz, 176.4 KHz, 192 KHz - 16bit, 24bit or 32bit
- FIFO Memory: 4MB SRAM
- Crystal Oscillators for MCLK
- LED indicators (Power, Full, Lock, Empty, Sample Rate, Mclk)
- DC power supply: 5V/3A with Filter circuits
- Multi-frequency output capability
- Automatically switching frequencies according to the input I2S signals
- Flip-Flops added on I2s signals output from FPGA for synchronization with MCLK
- Ultra-low-noise voltage regulators for optimal audio performance
- Integrated EEPROM for automatic configuration (with write-protection)
VOLT AMPLIFIER
- Class D amplifier up to 2 x 50W Max
- 4 to 8-O BTL Load
- 90% POWER EFFICIENCY
- SNR 102dB
- Supply Voltage: UP TO 24V DC
- Operating Temperature: -40∞C to 85∞C Ambient
- Board Size LWH = 58mm * 86.75mm * 32.06mm
- W¸rth Inductors, TI TPA3118 chipset, film capacitors and ± 1% thin film resistors
- 4 output filters, 4 EMI Snubbers, 4 bootstrap capacitors and gain setting components
- Additional Provision for stepped attenuator volume control