When we try out audio boards for the Raspberry Pi we usually install a GNU/Linux distro designed for audio playback. Like max2play, Volumio, Moode. Today I'm going to share a different experience: bit-perfect audio playback on Ubuntu MATE for Raspberry Pi with the JustBoom Digi HAT.
First, we have to install Ubuntu and make sure that the JustBoom Digi HAT is recognized by the kernel. Download Ubuntu MATE image for Raspberry Pi from https://ubuntu-mate.org/download/. Flash the image to a 16GB or more micro SDHC card (8GB is not enough). In Windows environment you can extract the image with 7-Zip and use Win32 Disk Imager to write the image on the SD card. In Linux you can launch the Following commands:
sudo apt-get install xz-utils gddrescue
unxz ubuntu-mate-16.04.2-desktop-armhf-raspberry-pi.img.xz
sudo ddrescue -D --force ubuntu-mate-16.04.2-desktop-armhf-raspberry-pi.img /dev/sdx
Where the x in /dev/sdx needs to be replaced with your actual SD device number (Use the lsblk command to list block devices and find the corresponding filesystem). Insert the miro SDHC card into the Raspberry Pi, connect a keyboard, a mouse and a monitor connected via HDMI and power up the computer.


During the installation procedure, choose the language, the machine name, the username and the password, then make yourself a good espresso coffee while Ubuntu finishes the installation. Once logged into it, go to the specific "Raspberry Pi information" section from the welcome menu and resize the file system if you want to use the full space on the SD (fig. 1-3). After the reboot, open a terminal from the "Applications" drop-down menu, log in it by entering your chosen username and password and install and launch the raspi-config application:
sudo apt-get update
sudo apt-get install raspi-config -y
sudo raspi-config
From the raspi-config interface, select "Interfacing Options – Configure connections to peripherals" and enable SSH and SPI, then enter "Finish" and "Reboot". After the reboot, if the screen is black, disconnect the HDMI cable and restart the Raspberry Pi by removing and plugging again the power cable. Once the reboot is completed, you can connect again the RPI to the monitor via the HDMI cable. Now, you can also access the RPI remotely via SSH. Just find the IP address of the RPI and enter the password after having launched the command ssh username@your_ip (eg. in my case: ssh pi@192.168.1.186). Running the command aplay -l you can check whether the Digi HAT is detected. If not, you may need to update the kernel:
sudo apt-get dist-upgrade
reboot
Edit the /boot/config.txt file and make sure the following lines are present and uncommented:
max_usb_current=1

dtparam=spi=on
dtparam=i2c_arm=on
dtparam=spi=on
dtparam=i2s=on

dtoverlay=justboom-digi
dtdebug=1
Make sure, too, that the audio=on=dtparam line is commented, removed or replaced with dtparam=audio=off
After the restart, the aplay -l command should return the following output:
card 1: sndrpijustboomd [snd_rpi_justboom_digi], device 0: JustBoom Digi HiFi wm8804-spdif-0 []
If this is the case, you know the soundcard has been recognized. Unfortunately, that was not my case, so, I had to work around the problem by including the HiFiBerry Digi parameter in place of the Justboom Digi HAT one. In practice, I have just replaced dtoverlay=justboom-digi with dtoverlay=hifiberry-digi in the /boot/config.txt file. After having restarted the system, the aplay -l returned now the following output:
card 1: sndrpihifiberry [snd_rpi_hifiberry_digi], device 0: Hifiberry Digi HiFi wm8804-spdif-0 []

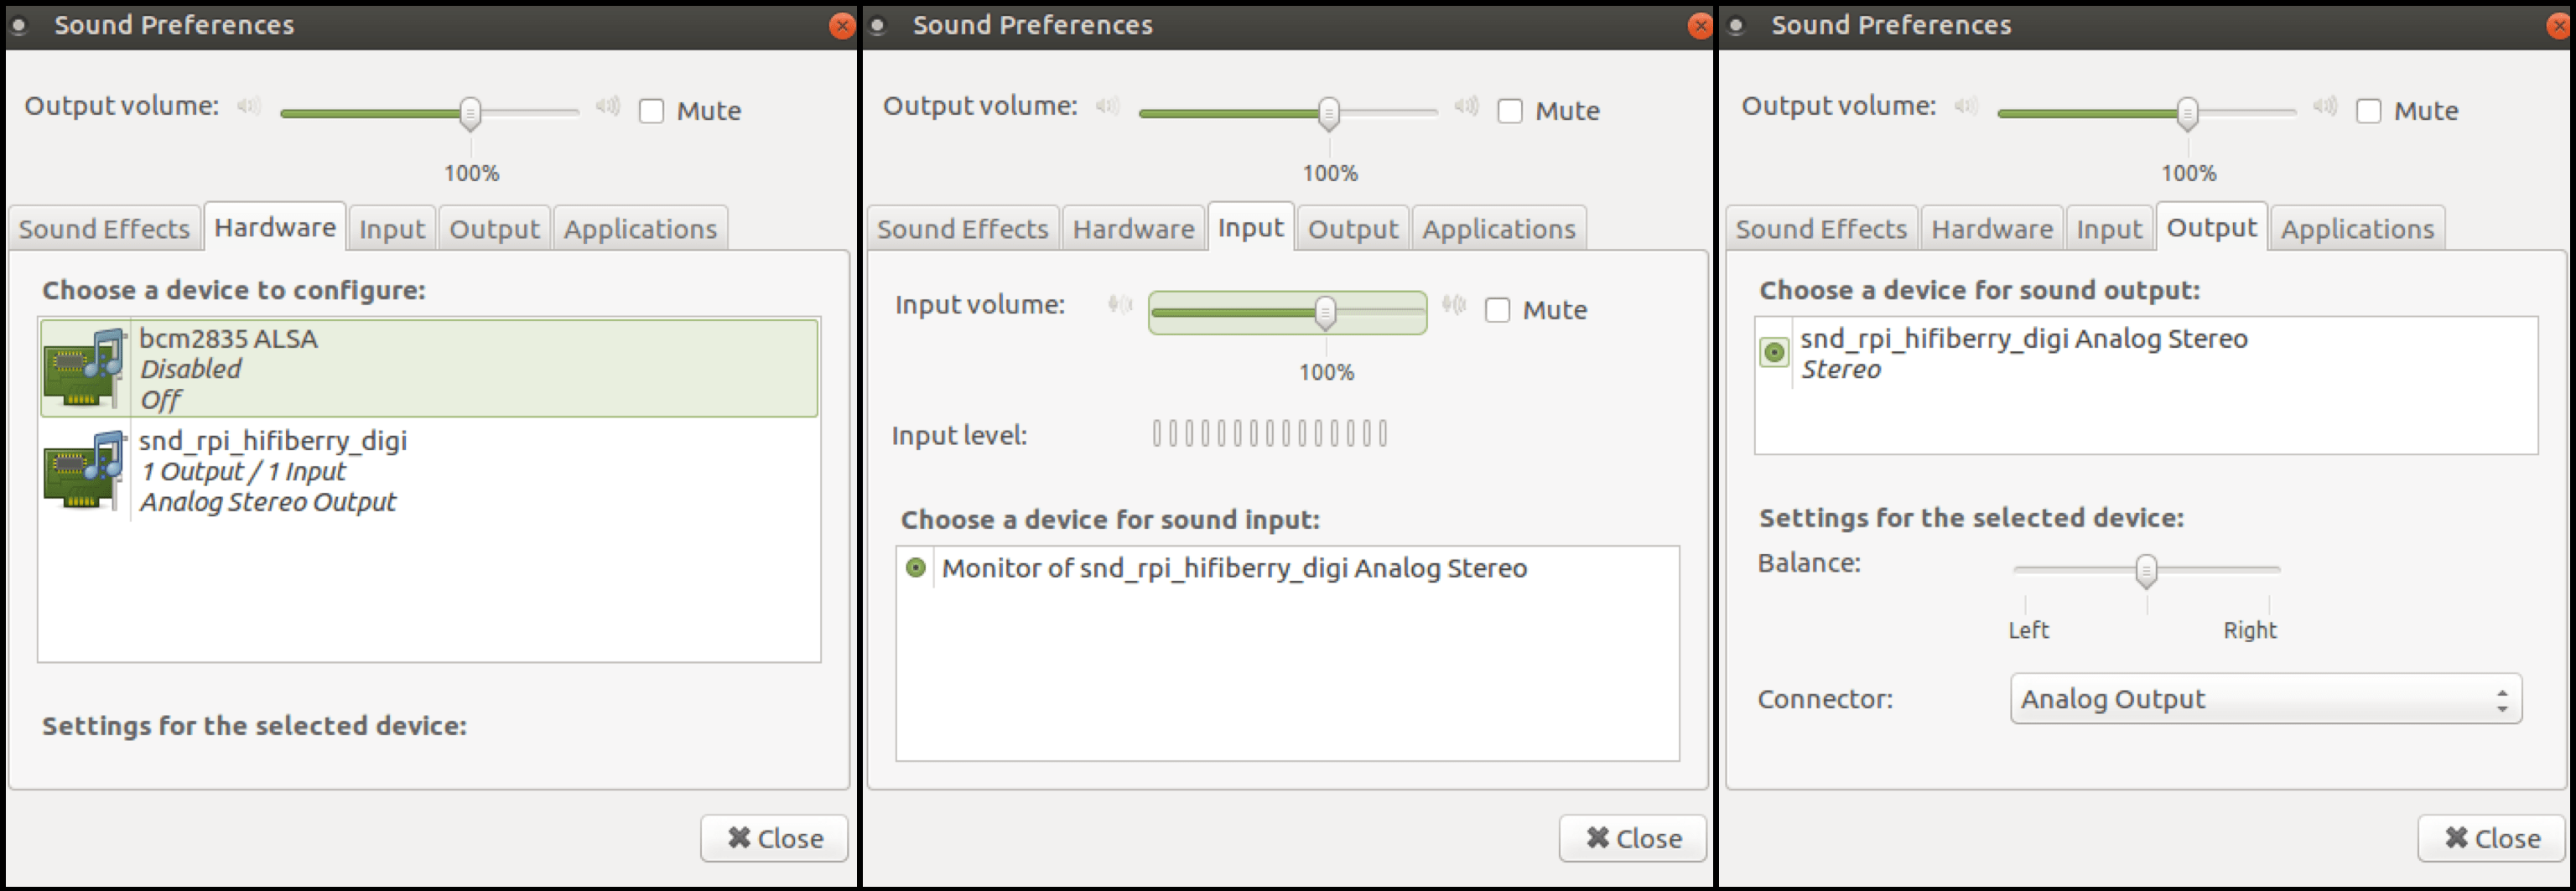
We can set the snd_rpi_hifiberry_digi card as the only audio output even in graphical mode: System > Preference > Hardware> Sound > (or Applications > Sound & Video > Sound) > Sound Preferences. Here, select snd_rpi_hifiberry_digi as "output" and snd_bcm2835 ALSA as "off" on the Hardware tab (fig. 4-6). For added security, create a /etc/asound.conf file with the following lines:
pcm.!default {
    type hw
    card 1
    device 0
}
ctl.!default {
    type hw
    card 1
    device 0
}
Now save that file and edit the /etc/pulse/client.conf one. Change the line autospawn = yes in autospawn = no and reboot the system.
JustBoom Digi HAT with GMusicBrowser, Quodlibet and VLC as quasi-bit-perfect players
I must confess that my (few) attempts to install DeadBeef and Guayadeque on the latest version of Ubuntu MATE have not been successful (I'm not even sure there's a version of those players for arm7l architectures), so I carried out my test only on GMusicBrowser, QuodLibet and VLC.
JustBoom Digi HAT with GMusicBrowser
For those who wish to make an attempt with GmusicBrowser, this is the procedure I followed. Install GMusicBrowser via apt-get:
sudo apt-get update
sudo apt-get install -y gstreamer0.10-alsa
sudo apt-get install -y gmusicbrowser


In graphical mode, set GMusicBrowser through its GUI: Applications > Sound & Video > gmusicbrowser > Settings > (the gear icon at the top right corner) > Audio. Check "gstreamer 1.x", select "output device: alsa", check "Use gstreamer port: 8000", uncheck "Use Replay Gain". Then, click on "Advanced Settings", check "alsa device: hw: 1,0" and Close. From the "Layout" tab, near the "Main" tab, choose the layout you prefer. I opted for "with browser (Tree Song)" (fig. 7-10).
If we want to change the parameters via command line, the configuration file is ~/.config/gmusicbrowser/gmbrc. Here is how the lines under the playback head should appear:
gst_alsa_device: "hw:1,0"
gst_custom_history:
- ''
gst_gapless: 1
gst_rg_songmenu: 0
gst_sink: alsa
gst_sync_EQpresets: 0
rg_fallback: 0
rg_limiter: 0
rg_preamp: 0
use_GST_for_server: 1
use_equalizer: 0
use_replaygain: 0
Try to have a look at the hw_params file while you're playing some tracks:
sudo cat /proc/asound/card*/pcm*p/sub*/hw_paramsFor a 24bit/96K .flac file I had:
access: RW_INTERLEAVED
format: S32_LE
subformat: STD
channels: 2
rate: 96000 (96000/1)
period_size: 960
buffer_size: 19200
For a 16bit/44.1K .flac file I had:
access: RW_INTERLEAVED
format: S16_LE
subformat: STD
channels: 2
rate: 44100 (44100/1)
period_size: 441
buffer_size: 8820
Even here, we note that the 24 actual bits of the first file are padded to 32 – by adding eight zeros – because the soundcard or the driver work with 32 bits but not with 24 (S32_LE instead of S24_LE). Obviously, there is no further information in the added zeros, so the audio quality remains what it was. For the second file, the format indicates correctly S16_LE, so we know that at least 16bit are received. That aside, the biggest limit of GmusicBrowser, compared to QuodLibet or VLC, is that it doesn't play .wav files (maybe because they don't natively support metadata).
JustBoom Digi HAT with QuodLibet
Let's install Quodlibet via apt-get:
sudo apt-get install quodlibet

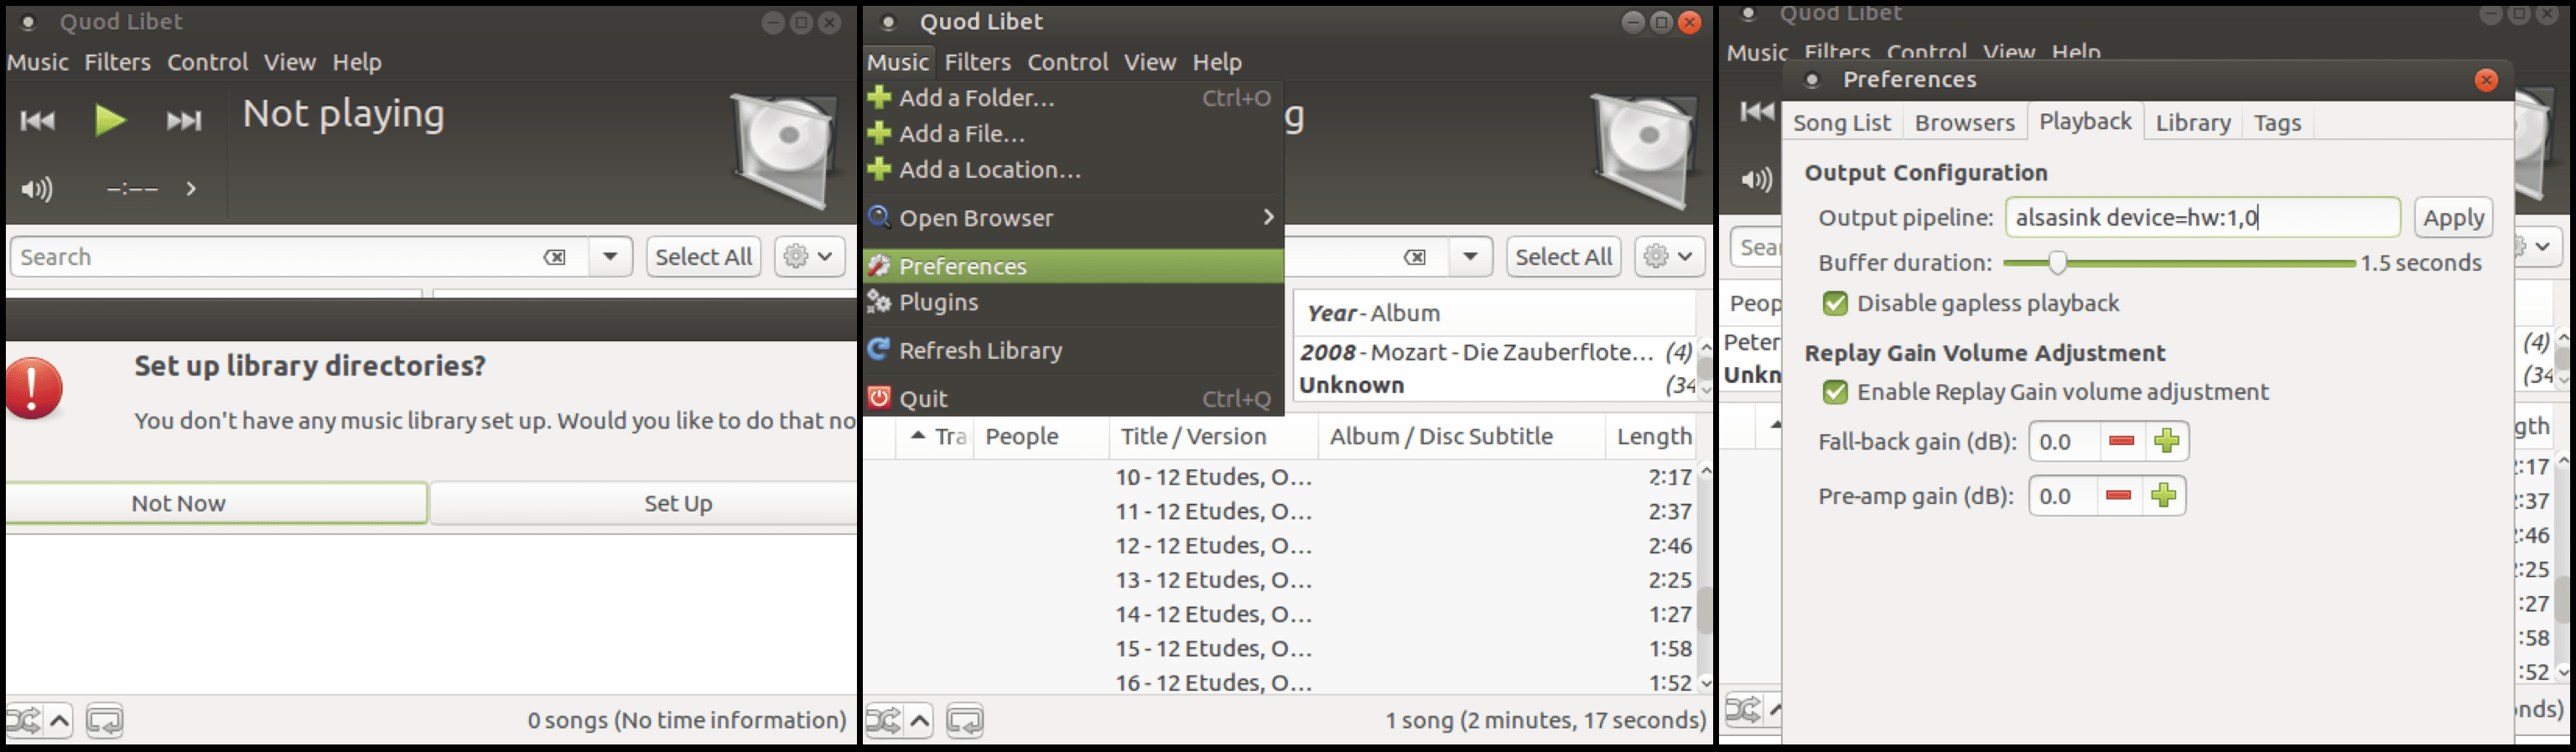
Now, run the player from Applications > Sound & Video > Quod Libet. The system will ask you if you want setup the music library (you can say "Set Up" or "Not Now"). To make it recognize the soundcard, set the parameters from the menu: Music > Preferences. Go on the Playback tab and write alsasink device=hw:1,0 in the blank space to the right of "Output pipeline". Uncheck "Enable Replay Gain volume adjustment" and apply the changes (fig. 11-13). You can do the same changes from the command line by editing the ~/.quodlibet/config file:
gst_pipeline = alsasink device=hw:1,0
replaygain = false
The parameters for the previous two .flac files (24bit/96K and 16bit/44.1K) are the same of GMusicBrowser, but QuodLibet supports .wav files too, as you will notice from the output of the following files:
BitPerfect_44.1K16Bit.wav
access: RW_INTERLEAVED
format: S16_LE
subformat: STD
channels: 2
rate: 44100 (44100/1)
period_size: 441
buffer_size: 8820
and BitPerfect_44.1K24Bit.wav
access: RW_INTERLEAVED
format: S32_LE
subformat: STD
channels: 2
rate: 44100 (44100/1)
period_size: 441
buffer_size: 8820
The only thing I would say about these two players is that, given the same hardware, setting them for bit-perfect (or nearly bit-perfect) makes the sound quality much more dependent on the quality of the recording – which can be a good or bad thing, depending on the files you have. Unlike other MPD players, I have not found many client applications for the remote management of these GStreamer-based servers. If you wish to control them remotely, i.e. via web interface or Bluetooth, you can install anyRemote:
sudo apt-get install -y anyremote anyremote-data ganyremote

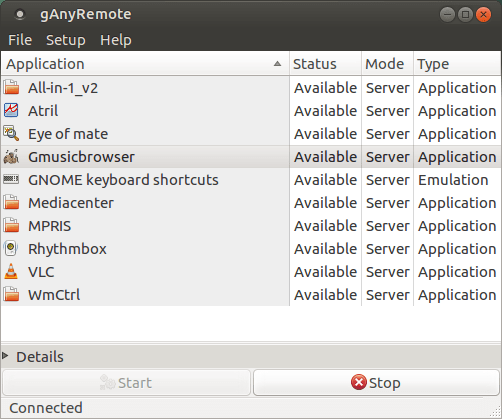
192.168.1.186:5080 (fig. 14). The same graphics will appear on your mobile device if you will install the app for Android. In that case, you'll be able to connect and control the player via TCP/IP or Bluetooth mode. But I warn you, nothing to do with the charming graphics and the sophisticated layout of the LMS's GUI.
JustBoom Digi HAT with VLC

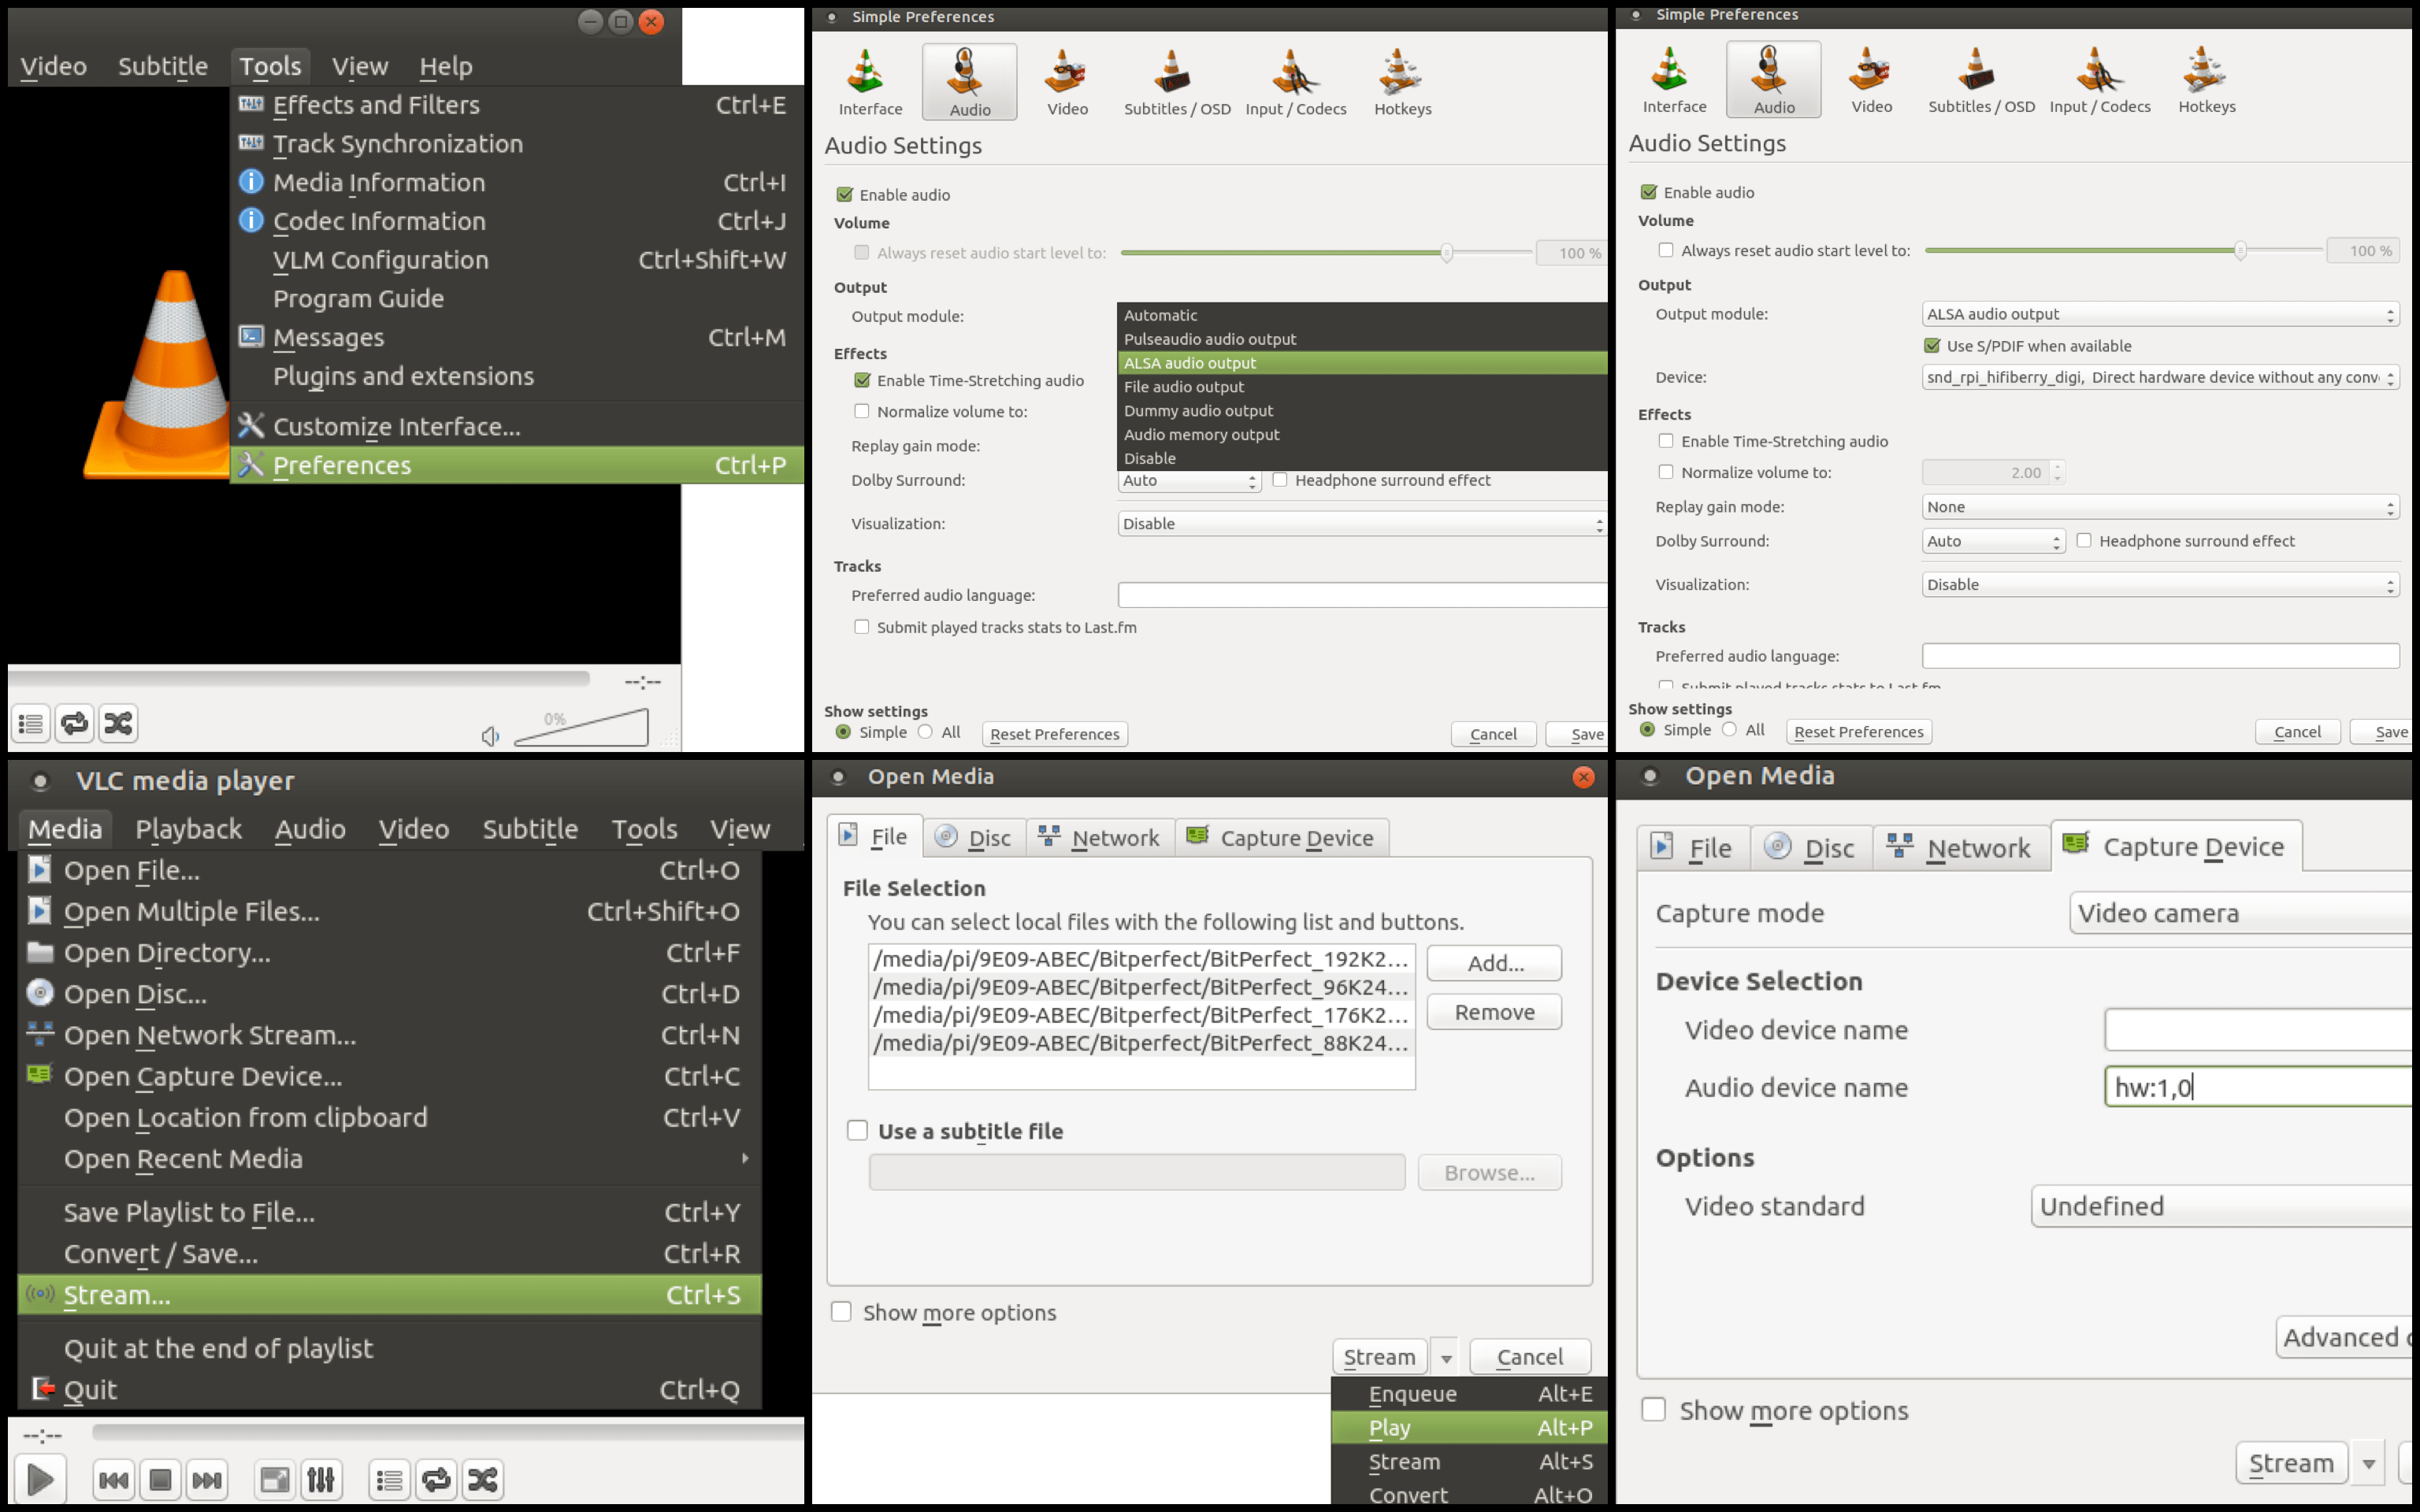
.wav files.
For remote control via web interface go to Tools > Preferences. Click on "All" at the bottom left corner in order to show the advanced settings. Scroll down the list on the left side and select "Main interfaces", under the "Interface" header. Click on the "Web" box and save the configuration. Go to "Lua" under "Main interfaces", write your password in the white box under "HTTP Lua" and save. Now, you can browse the Raspberry Pi's IP from a remote device (leave the username field blank and enter your password) to control the playback. You can do the same via mobile devices using some app like VLC Mobile Remote.
VLC has made me a very good impression.